Online Sale!
100% Guaranteed Genuine Parts
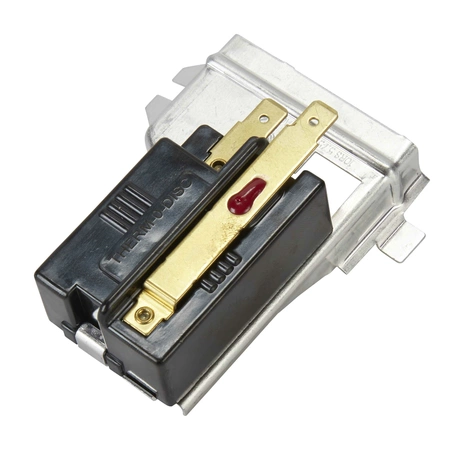
WP338906 Whirlpool Dryer Gas Sensor
The Gas Dryer Flame Sensor reacts to the heat from the ignitor, allowing the gas valve to open and the dryer to create heat. If your appliance isn't heating as expected during operation, replacing this part may alleviate the issue. This sensor is located across from the gas igniter at the dryer’s burner assembly and should be closed for continuity at room temperature. Be sure to check for continuity with a multimeter before installing a new sensor. Replacing this part will require basic hand tools, some disassembly of the appliance and novice repair experience. You must unplug the appliance or shut off the house circuit breaker before installing this part. Recommended Item: While the dryer is disassembled, consider replacing the gas valve coils (item 279834) as well.
Part Specification
• This product is a Factory Certified Part. These three words represent quality parts and accessories designed specifically for your appliance. Time tested engineering that meets our strict quality specifications
• This product is a replacement part
• Package contains (1) Gas Dryer Flame Sensor
• Tools Needed: Multi screwdriver
Weight : 0.02 lbs
Package Dimension : 1.93 x 1.18 x 1.34
Compatible Brands


About this product
The Gas Dryer Flame Sensor reacts to the heat from the ignitor, allowing the gas valve to open and the dryer to create heat. If your appliance isn't heating as expected during operation, replacing this part may alleviate the issue. This sensor is located across from the gas igniter at the dryer’s burner assembly and should be closed for continuity at room temperature. Be sure to check for continuity with a multimeter before installing a new sensor. Replacing this part will require basic hand tools, some disassembly of the appliance and novice repair experience. You must unplug the appliance or shut off the house circuit breaker before installing this part. Recommended Item: While the dryer is disassembled, consider replacing the gas valve coils (item 279834) as well.
Part Specification
• This product is a Factory Certified Part. These three words represent quality parts and accessories designed specifically for your appliance. Time tested engineering that meets our strict quality specifications
• This product is a replacement part
• Package contains (1) Gas Dryer Flame Sensor
• Tools Needed: Multi screwdriver
Part Specification
• This product is a Factory Certified Part. These three words represent quality parts and accessories designed specifically for your appliance. Time tested engineering that meets our strict quality specifications
• This product is a replacement part
• Package contains (1) Gas Dryer Flame Sensor
• Tools Needed: Multi screwdriver
Weight : 0.02 lbs
Package Dimension : 1.93 x 1.18 x 1.34
The following parts are replaced by this product
- 303377
- 338906
- DE353
- 63-5013
- 63-5013
- 35001096
- Y303377
Step 1: Unplug the refrigerator and turn off the water valve.
Step 2: Remove the access panel. On some model refrigerators this may require removing screws.
Step 3: Locate the SENSOR. This can be found near or behind the evaporator coils.
Step 4: Disconnect the wires connected to the SENSOR. Make sure to label each wire so it is easy to remember how to reconnect them when reinstalling the new SENSOR.
Step 5: Remove the old SENSOR by unscrewing it from the mounting bracket.
Step 6: Install the new SENSOR in the same position as the old one, and make sure to secure it with screws.
Step 7: Reattach the wires and make sure all the connections are secure.
Step 8: Replace the access panel and re-secure any screws that were removed.
Step 9: Plug the refrigerator back in, and turn the water valve back on.
Step 10: Test the new SENSOR to ensure optimal operation.
Please keep in mind, these instructions are for general guidance and should always be used in conjunction with the manufacturer's manual, if available.


Login and Registration Form