Online Sale!
100% Guaranteed Genuine Parts
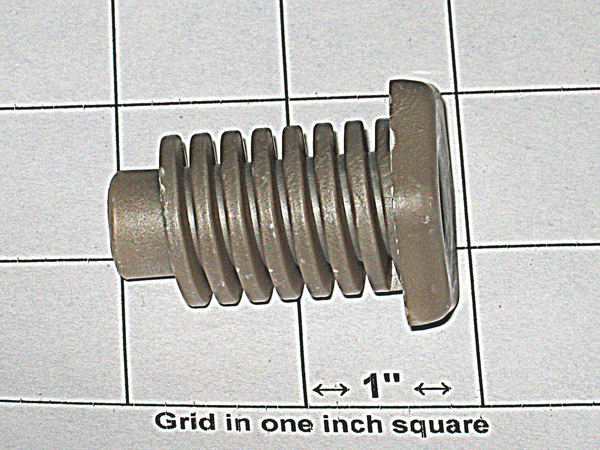
WPW10058460 Whirlpool Appliance Levelling Leg
This Range Leveling Leg is a plastic replacement part that allows your appliance to sit flat. Install the new leveling leg and then test if you have it adjusted properly by putting the appliance on four legs. Adjust in or out as required if your oven is rocking. We recommend checking the other leveling leg on your appliance to confirm if it is damaged or worn; replace if necessary. Note this part is for use at the rear of the range only. Each leveling leg is sold separately. Please see your model number. Replacing this part will require basic hand tools, some disassembly of the oven and novice repair experience.
Part Specification
• This product is a Factory Certified Part. These three words represent quality parts and accessories designed specifically for your appliance. Time tested engineering that meets our strict quality specifications
• This product is a replacement part
• Package contains (1) Range Leveling Leg
• Tools Needed: Pliers, wooden block
Weight : 0.18 lbs
Package Dimension : 4.06 x 3.31 x 1.89
Compatible Brands


About this product
This Range Leveling Leg is a plastic replacement part that allows your appliance to sit flat. Install the new leveling leg and then test if you have it adjusted properly by putting the appliance on four legs. Adjust in or out as required if your oven is rocking. We recommend checking the other leveling leg on your appliance to confirm if it is damaged or worn; replace if necessary. Note this part is for use at the rear of the range only. Each leveling leg is sold separately. Please see your model number. Replacing this part will require basic hand tools, some disassembly of the oven and novice repair experience.
Part Specification
• This product is a Factory Certified Part. These three words represent quality parts and accessories designed specifically for your appliance. Time tested engineering that meets our strict quality specifications
• This product is a replacement part
• Package contains (1) Range Leveling Leg
• Tools Needed: Pliers, wooden block
Part Specification
• This product is a Factory Certified Part. These three words represent quality parts and accessories designed specifically for your appliance. Time tested engineering that meets our strict quality specifications
• This product is a replacement part
• Package contains (1) Range Leveling Leg
• Tools Needed: Pliers, wooden block
Weight : 0.18 lbs
Package Dimension : 4.06 x 3.31 x 1.89
The following parts are replaced by this product
- 312701
- 3150150
- 9761935
- W10058460
Replacing the WPW10058460 Whirlpool Leveling Leg
1. Safety First: Make sure the appliance is unplugged and all components are off before attempting to replace the leg.
2. Using a flathead screwdriver or putty knife, remove the kick plate located at the bottom of the unit.
3. Locate the leveling leg by following the path of the foot onto the object.
4. Using either a wrench or adjustable pliers, remove the nut from the leveling leg.
5. Insert the replacement leg into the hole and use the same tool to tighten the nut.
6. Test the new leg for stability and make sure it is securely in place.
7. Re-install the kick plate and plug the appliance back in.
Please keep in mind, these instructions are for general guidance and should always be used in conjunction with the manufacturer's manual, if available.


