100% Guaranteed Genuine Parts
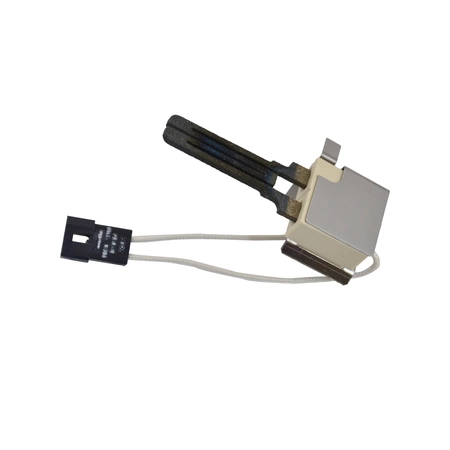
D510184P Speed Queen Dryer Igniter and Bracket Assembly
Maintain the performance of your dryer with the D510184P igniter and bracket assembly, a key component designed to ensure efficient functioning. This high-quality igniter is an essential part for Speed Queen dryers, and seamlessly compatible with Amana and Alliance brands as well. When it's time for a replacement, this igniter provides reliable ignition, minimizing downtime and restoring your appliance to peak performance. Crafted with durability in mind, this part meets strict quality standards, ensuring longevity and reliability. Perfect for DIY repairs, the installation process is straightforward, making it an ideal choice for both seasoned technicians and first-time fixers. Invest in your dryer’s efficiency and get back to laundry day without delay.
Weight : 0.37 lbs
Package Dimension : 5.20 x 3.19 x 3.11
Compatible Brands


About this product
Maintain the performance of your dryer with the D510184P igniter and bracket assembly, a key component designed to ensure efficient functioning. This high-quality igniter is an essential part for Speed Queen dryers, and seamlessly compatible with Amana and Alliance brands as well. When it's time for a replacement, this igniter provides reliable ignition, minimizing downtime and restoring your appliance to peak performance. Crafted with durability in mind, this part meets strict quality standards, ensuring longevity and reliability. Perfect for DIY repairs, the installation process is straightforward, making it an ideal choice for both seasoned technicians and first-time fixers. Invest in your dryer’s efficiency and get back to laundry day without delay.
Weight : 0.37 lbs
Package Dimension : 5.20 x 3.19 x 3.11
The following parts are replaced by this product
- 40069801P
- 510184P
- 60868
- 60868
- 510184P
- 503604
- 510184
DIY Instructions For Replacing the D510184P Speed Queen Dryer Igniter and Bracket Assembly
1. Unplug the Dryer: Before beginning any repair on your dryer, make sure to unplug it from the wall outlet.
2. Remove the Cabinet: Take off the screws from the back of the cabinet and remove it from the dryer.
3. Locate the Igniter and Bracket Assembly: Search for the assembly and remove the screws holding it in place.
4. Install the New Igniter and Bracket Assembly: Place the new igniter and bracket assembly in its spot and retighten the screws so it is securely in place.
5. Reassemble the Cabinet: Place the cabinet back onto the dryer and secure it with the screws that you took out at the beginning of the process.
6. Plug the Dryer Back In: After ensuring that all components are correctly in place, plug the dryer back into its outlet and test to be sure that the repair was successful.
Please keep in mind, these instructions are for general guidance and should always be used in conjunction with the manufacturer's manual, if available.


