Online Sale!
100% Guaranteed Genuine Parts
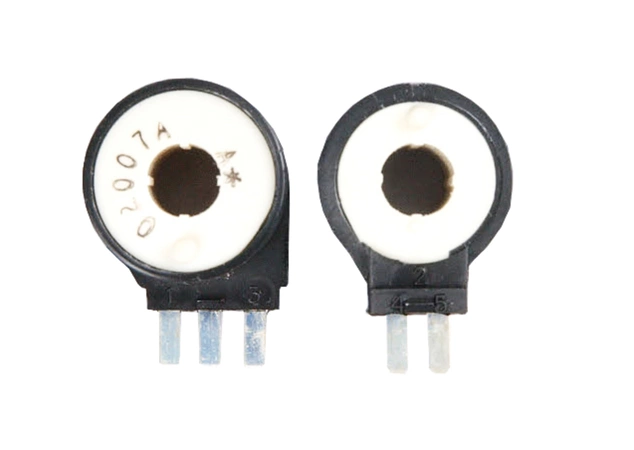
5303931775 Frigidaire Dryer Coil Kit
Ensure your dryer operates smoothly with this essential heating element replacement kit. Designed specifically for various brands including Electrolux, Frigidaire, and Kenmore, this product guarantees compatibility and reliable performance with models from Crosley, Gibson, Kelvinator, Tappan, and Westinghouse.
The heating coil kit is made from high-quality materials, ensuring longevity and optimal heating efficiency. Installation is straightforward, making it a perfect solution for DIY enthusiasts and professionals alike. Say goodbye to damp clothes and lengthy drying times by restoring your appliance’s functionality today. With this reliable coil kit, you can maintain your dryer’s peak performance, ensuring your laundry routine remains hassle-free. Invest in this crucial component for a more efficient and effective drying experience.
Weight : 0.30 lbs
Package Dimension : 6.61 x 3.66 x 1.73
Compatible Brands


About this product
Ensure your dryer operates smoothly with this essential heating element replacement kit. Designed specifically for various brands including Electrolux, Frigidaire, and Kenmore, this product guarantees compatibility and reliable performance with models from Crosley, Gibson, Kelvinator, Tappan, and Westinghouse.
The heating coil kit is made from high-quality materials, ensuring longevity and optimal heating efficiency. Installation is straightforward, making it a perfect solution for DIY enthusiasts and professionals alike. Say goodbye to damp clothes and lengthy drying times by restoring your appliance’s functionality today. With this reliable coil kit, you can maintain your dryer’s peak performance, ensuring your laundry routine remains hassle-free. Invest in this crucial component for a more efficient and effective drying experience.
Weight : 0.30 lbs
Package Dimension : 6.61 x 3.66 x 1.73
DIY Steps to Replace Frigidaire 5303931775 Coil Kit
1. Safety first: Unplug your fridge from the power outlet before you begin the replacement project.
2. Gather the parts: Before starting the repair, it is important that you have all the necessary parts and tools at your disposal. For this particular replacement project, you will need the 5303931775 Frigidaire Coil Kit and a flathead screwdriver.
3. Open up the back panel: Using the flathead screwdriver, remove the screws in the back of the fridge that are holding the panel in place. Once the screws have been removed, carefully pull the panel off.
4. Identify the coil kit parts: Inside the fridge, you should be able to easily locate the coil kit parts. Make sure to identify the parts before you begin any work.
5. Disconnect the old coil kit: Use the flathead screwdriver to loosen the screws that are holding the old coil kit in place. Then, carefully remove the parts by disconnecting them from the fridge’s electrical connections.
6. Install the new coil kit: Position the new coil kit in the same manner as the old one and use the screws to securely attach the parts. Finally, reconnect the electrical connections.
7. Test the new coil kit: Once the new coil kit has been installed, test it to make sure everything is working properly. If everything checks out, the repair is complete.
8. Close up the back panel: Securely fasten the back panel back into place using the screws. Plug the fridge back in and enjoy the improved cooling performance that comes from having a brand new coil kit.
Please keep in mind, these instructions are for general guidance and should always be used in conjunction with the manufacturer's manual, if available.


