Online Sale!
100% Guaranteed Genuine Parts
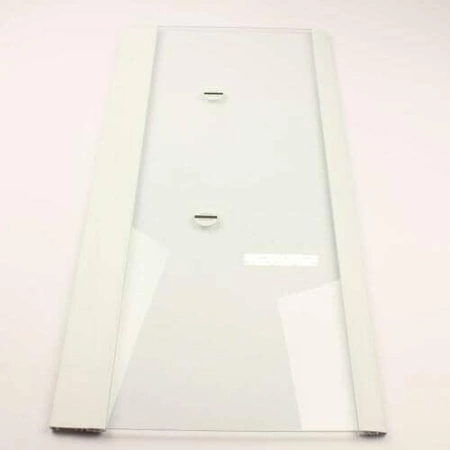
WPW10283860 Whirlpool Glass Shelf
WPW10283860 is an original equipment manufactured (OEM) part. Enhance your refrigerator's organization and functionality with this glass shelf, designed specifically for various models from leading brands, including Whirlpool, Kenmore, and Maytag. Constructed with high-quality materials, it offers a durable and stylish solution for handling your food storage needs. This versatile shelf fits seamlessly into refrigerators, providing ample space for your perishables while allowing for easy visibility and access. Whether you're replacing an old shelf or customizing your fridge, this product ensures a perfect fit and dependable performance. Trust in a trusted name like Whirlpool to keep your kitchen running efficiently. Maintain your appliance today and enjoy the benefits of a more organized and accessible food storage area.
Weight : 9.92 lbs
Package Dimension : 31.25 x 19.62 x 2.25
Compatible Brands


About this product
WPW10283860 is an original equipment manufactured (OEM) part. Enhance your refrigerator's organization and functionality with this glass shelf, designed specifically for various models from leading brands, including Whirlpool, Kenmore, and Maytag. Constructed with high-quality materials, it offers a durable and stylish solution for handling your food storage needs. This versatile shelf fits seamlessly into refrigerators, providing ample space for your perishables while allowing for easy visibility and access. Whether you're replacing an old shelf or customizing your fridge, this product ensures a perfect fit and dependable performance. Trust in a trusted name like Whirlpool to keep your kitchen running efficiently. Maintain your appliance today and enjoy the benefits of a more organized and accessible food storage area.
Weight : 9.92 lbs
Package Dimension : 31.25 x 19.62 x 2.25
The following parts are replaced by this product
- 2264803
- W10283860
Replacing the Whirlpool WPW10283860 SHELF-GLAS Step by Step DIY Instructions
1. Turn off the power to the refrigerator before beginning. Unplug the unit or shut off the circuit breaker in order to prevent electric shock.
2. Open the refrigerator's freezer door and locate the bottom shelf, which is held in place by metal brackets. Install a replacement shelf by pushing it into place on the metal brackets.
3. Find the top shelf, which is most likely held in place with plastic plugs and metal pins. Use a flat head screwdriver to pop out the metal pins.
4. Slide the shelf up and out of the slots in the side walls of the freezer compartment. You may need to slightly tip the shelf up and down to get it out of the slots.
5. Put the new shelf in and align the pins with the slots. Push the shelf down, making sure the pins slide back in.
6. Put the plastic plugs along the bottom edge of the shelf, ensuring all are securely inserted into the slats.
7. Replace the bottom shelf first, as it’s easier to access than the top shelf. Then replace the top shelf with a replacement shelf.
8. Reinstall any additional shelves that were removed, if necessary, following the same steps.
9. Plug in the refrigerator, turn on the electricity, and check if the new shelf works properly. Adjust if necessary to ensure that the shelf is level and secure before replacing any food items.
Please keep in mind, these instructions are for general guidance and should always be used in conjunction with the manufacturer's manual, if available.
Please Verify Your Purchase to Submit a Review
Please note: We use this information only to confirm your purchase, it won’t be published.


