Online Sale!
100% Guaranteed Genuine Parts
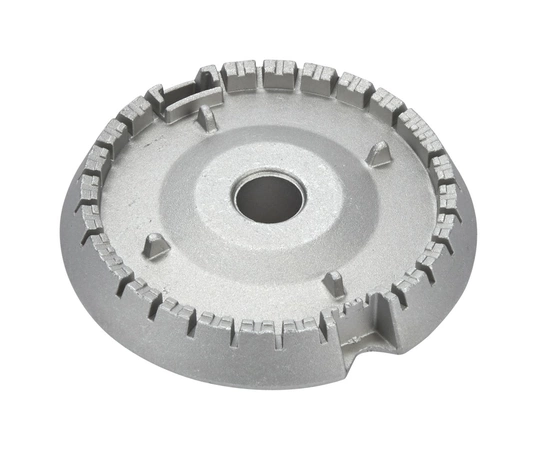
WPW10256028 Whirlpool Stove Surface Burner Base
This Gas Range Surface Burner Base distributes the gas through holes or slots to create an even flame across the cooking area. Installing this item will require basic hand tools, some disassembly of the range and novice repair experience. Remember to unplug the range or shut off the house circuit breaker for the appliance before installing this item. Also make sure to turn off the gas valve before the repair.
Part Specification
• This product is a Factory Certified Part. These three words represent quality parts and accessories designed specifically for your appliance. Time tested engineering that meets our strict quality specifications
• This product is a replacement part
• Package contains (1) Gas Range Surface Burner Base
• Tools Needed: Multi screwdriver
Weight : 0.52 lbs
Package Dimension : 7.56 x 6.18 x 1.54
Compatible Brands


About this product
This Gas Range Surface Burner Base distributes the gas through holes or slots to create an even flame across the cooking area. Installing this item will require basic hand tools, some disassembly of the range and novice repair experience. Remember to unplug the range or shut off the house circuit breaker for the appliance before installing this item. Also make sure to turn off the gas valve before the repair.
Part Specification
• This product is a Factory Certified Part. These three words represent quality parts and accessories designed specifically for your appliance. Time tested engineering that meets our strict quality specifications
• This product is a replacement part
• Package contains (1) Gas Range Surface Burner Base
• Tools Needed: Multi screwdriver
Part Specification
• This product is a Factory Certified Part. These three words represent quality parts and accessories designed specifically for your appliance. Time tested engineering that meets our strict quality specifications
• This product is a replacement part
• Package contains (1) Gas Range Surface Burner Base
• Tools Needed: Multi screwdriver
Weight : 0.52 lbs
Package Dimension : 7.56 x 6.18 x 1.54
The following parts are replaced by this product
- W10256028
DIY Replacement Instructions for a WPW10256028 Whirlpool Stove Surface Burner Base
Tools Needed:
• Flathead screwdriver
• Phillips screwdriver
• Safety glasses
Step 1: Disconnect the Power Supply
Before replacing the burner base, it is essential to cut power to the stove. To do this, locate the main power switch on the back wall of the stove and turn it off before proceeding to the next step.
Step 2: Remove the Outer Panel
Gently slide the flathead screwdriver beneath the edge of the outer panel and proceed to unscrew the screws securing it in place. Set aside the outer panel for reuse.
Step 3: Remove Burner Elements
Using the Phillips screwdriver, unscrew the screws holding the burner elements onto the existing burner base. Carefully remove the burner elements and set them aside.
Step 4: Remove Existing Burner Base
Next, carefully lift the existing burner base off the surface of the stove. Be sure to disconnect any electrical connections if they are present.
Step 5: Install New Burner Base
Place the new burner base into position and reconnect any electrical connections, if necessary. Secure the burner base with the screws already removed in Step 3.
Step 6: Reinstall Burner Elements
Reinstall the burner elements onto the new burner base with the Phillips screwdriver.
Step 7: Reinstall Outer Panel
Lastly, reinstall the outer panel to its original position and secure with the screws from Step 2.
Step 8: Test
Once all the burner elements and the outer panel are back in place, turn the power back on and test the burner base. Make sure that all the elements are heating up properly.
Please keep in mind, these instructions are for general guidance and should always be used in conjunction with the manufacturer's manual, if available.


