Online Sale!
100% Guaranteed Genuine Parts
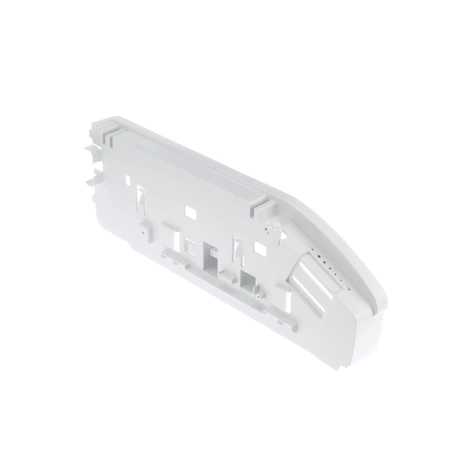
WPW10121977 Whirlpool End Cap
The Bottom Freezer Refrigerator Drawer Support End Cap snaps into place on the appliance’s pantry drawer to help contain the items inside. Note that your pantry drawer has two end caps (sold separately); this part is designed specifically to be used on the right side (from the point of view of looking into the appliance). This item is constructed of durable white plastic and can be used to easily replace a broken or missing part. Installation will not require tools or repair experience, but does involve minor disassembly of the refrigerator. Helpful Tip: Also consider replacing the left-hand Drawer Support End Cap (item WPW10122078) at the same time that you install this part.
Part Specification
• This product is a Factory Certified Part. These three words represent quality parts and accessories designed specifically for your appliance. Time tested engineering that meets our strict quality specifications
• This product is a replacement part
• Package contains (1) Bottom Freezer Refrigerator Drawer Support End Cap, Right Side
• No tools required for installation
Weight : 6.91 lbs
Package Dimension : 7.69 x 4.82 x 24.13
Compatible Brands


About this product
The Bottom Freezer Refrigerator Drawer Support End Cap snaps into place on the appliance’s pantry drawer to help contain the items inside. Note that your pantry drawer has two end caps (sold separately); this part is designed specifically to be used on the right side (from the point of view of looking into the appliance). This item is constructed of durable white plastic and can be used to easily replace a broken or missing part. Installation will not require tools or repair experience, but does involve minor disassembly of the refrigerator. Helpful Tip: Also consider replacing the left-hand Drawer Support End Cap (item WPW10122078) at the same time that you install this part.
Part Specification
• This product is a Factory Certified Part. These three words represent quality parts and accessories designed specifically for your appliance. Time tested engineering that meets our strict quality specifications
• This product is a replacement part
• Package contains (1) Bottom Freezer Refrigerator Drawer Support End Cap, Right Side
• No tools required for installation
Part Specification
• This product is a Factory Certified Part. These three words represent quality parts and accessories designed specifically for your appliance. Time tested engineering that meets our strict quality specifications
• This product is a replacement part
• Package contains (1) Bottom Freezer Refrigerator Drawer Support End Cap, Right Side
• No tools required for installation
Weight : 6.91 lbs
Package Dimension : 7.69 x 4.82 x 24.13
The following parts are replaced by this product
- W10121977
Replacing the Whirlpool WPW10121977 ENDCAP
1. Start by unplugging the range or oven from the power source, and then move the appliance away from the wall to gain access to the back panel.
2. Remove the back panel screws with a screwdriver. The amount of screws will vary depending on the model of oven being serviced.
3. Disconnect the electrical connector from the end cap, if applicable.
4. Using a putty knife, pry off the old endcap.
5. Install the new endcap, aligning the slots with the pins in the oven.
6. Secure the endcap with screws and reattach the wiring connectors, if applicable.
7. Replace the back panel and secure it with screws.
8. Plug in the oven or range and test the new endcap for proper functioning.
Please keep in mind, these instructions are for general guidance and should always be used in conjunction with the manufacturer's manual, if available.


