Online Sale!
100% Guaranteed Genuine Parts
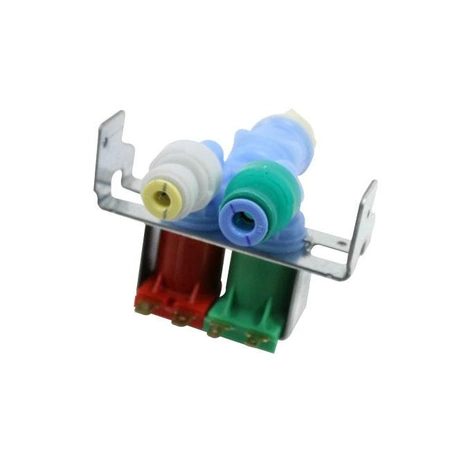
WP2317883 Whirlpool Water Inlet Valve
WP2317883 is an original equipment manufactured (OEM) part. Ensure your refrigerator operates smoothly with the reliable water inlet valve designed for compatibility with a wide range of brands, including Admiral, Amana, Jenn-Air, Kenmore, Kitchenaid, Magic Chef, Maytag, Norge, Roper, and Whirlpool.
This essential component regulates the flow of water into your appliance, ensuring it functions efficiently for ice and water dispensing. Constructed by Whirlpool, this durable valve offers a precise fit and consistent performance, making it a smart choice for your refrigerator repairs.
Whether you're tackling ongoing issues or performing routine maintenance, using genuine parts like this water inlet valve will help extend the life of your appliance. Improve functionality today and maintain your refrigerator's optimal performance with this dependable, high-quality valve.
Weight : 7.34 lbs
Package Dimension : 4.75 x 4.25 x 50.88
Compatible Brands


About this product
WP2317883 is an original equipment manufactured (OEM) part. Ensure your refrigerator operates smoothly with the reliable water inlet valve designed for compatibility with a wide range of brands, including Admiral, Amana, Jenn-Air, Kenmore, Kitchenaid, Magic Chef, Maytag, Norge, Roper, and Whirlpool.
This essential component regulates the flow of water into your appliance, ensuring it functions efficiently for ice and water dispensing. Constructed by Whirlpool, this durable valve offers a precise fit and consistent performance, making it a smart choice for your refrigerator repairs.
Whether you're tackling ongoing issues or performing routine maintenance, using genuine parts like this water inlet valve will help extend the life of your appliance. Improve functionality today and maintain your refrigerator's optimal performance with this dependable, high-quality valve.
Weight : 7.34 lbs
Package Dimension : 4.75 x 4.25 x 50.88
The following parts are replaced by this product
- 2317883
Step 1: Prepare the Work Area
Before beginning the replacement process, take into account the important safety considerations. Make sure that you have a flat and well-lit surface to work on, and that all power sources to the appliance are disconnected before starting the repair. Also, make sure the area is well ventilated and the gas has been shut off at the main shutoff valve before beginning.
Step 2: Gather the Necessary Parts and Tools
For this repair, you will need a Whirlpool WP2317883 VALVE-INLT, a Phillips screwdriver, a set of adjustable wrenches, and a basket wrench.
Step 3: Remove the Old Valve-INLT
Start by disconnecting the water supply line from the inlet valve. Then, use a Phillips screwdriver to remove the screws that secure the valve to the bracket. Once the screws are removed, carefully pull the valve out from the bracket. At this point, you can discard the old valve.
Step 4: Install the New Valve-INLT
Carefully place the new valve-inlt in the bracket, making sure it’s correctly positioned. Secure the valve with the screws you removed earlier.
Step 5: Reconnect the Water Supply Line
Attach the water supply line to the inlet valve, using a basket wrench. Make sure the connection is tight and secure.
Step 6: Test the New Valve-INLT
Once all the components are reconnected and the valve connected, turn on the water supply line, and then turn on the appliance to test the new valve and make sure everything is working correctly.
Step 7: Clean Up
Finally, put away the tools and parts you used, clean up the work area, and dispose of the old valve properly.
Please keep in mind, these instructions are for general guidance and should always be used in conjunction with the manufacturer's manual, if available.


