Online Sale!
100% Guaranteed Genuine Parts
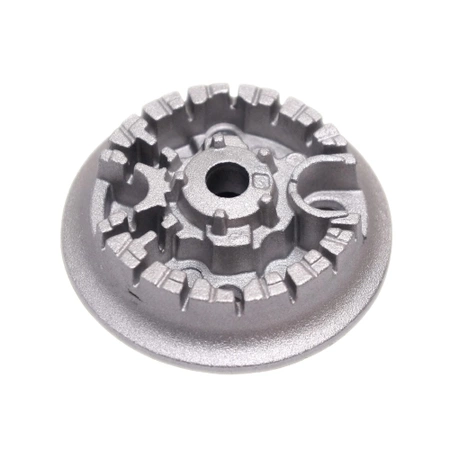
W11435630 Whirlpool Range Burner Head
W11435630 is an original equipment manufactured (OEM) part. Maintain your cooking experience with the W11435630 gas burner head, designed specifically for Whirlpool ovens and compatible with a range of brands including Admiral, Amana, Jenn-Air, Kenmore, Kitchenaid, Magic Chef, Maytag, Norge, and Roper. This high-quality replacement part enhances the efficiency and performance of your gas range, ensuring even heat distribution and reliable flame control for all your culinary needs.
Crafted for durability and easy installation, this burner head supports a variety of cooking techniques while maintaining safety standards. Whether you're replacing a worn-out component or performing routine maintenance, this part helps extend the life of your appliance. Ensure your oven remains at peak performance with this essential part for your kitchen.
Weight : 0.44 lbs
Package Dimension : 9.13 x 7.17 x 0.94
Compatible Brands


About this product
W11435630 is an original equipment manufactured (OEM) part. Maintain your cooking experience with the W11435630 gas burner head, designed specifically for Whirlpool ovens and compatible with a range of brands including Admiral, Amana, Jenn-Air, Kenmore, Kitchenaid, Magic Chef, Maytag, Norge, and Roper. This high-quality replacement part enhances the efficiency and performance of your gas range, ensuring even heat distribution and reliable flame control for all your culinary needs.
Crafted for durability and easy installation, this burner head supports a variety of cooking techniques while maintaining safety standards. Whether you're replacing a worn-out component or performing routine maintenance, this part helps extend the life of your appliance. Ensure your oven remains at peak performance with this essential part for your kitchen.
Weight : 0.44 lbs
Package Dimension : 9.13 x 7.17 x 0.94
Step 1: Unplug the Appliance
Before beginning any repair process, it is important to ensure that the appliance is unplugged. This will prevent any electrical shock.
Step 2: Remove the old burner head
Using a screwdriver, remove the screws that secure the burner head to the stovetop. Carefully lift out the burner head and set aside.
Step 3: Clean and inspect the burner area
Before installing the new burner head, make sure that the area where the burner head was located is clean and free of debris. Check for any damage or corrosion that may affect the burner head's performance.
Step 4: Install the new burner head
Line up the new burner head with the shafts on the stovetop, and lightly press it into place. Secure the burner head with the screws removed in Step 2.
Step 5: Test and use
Once the replacement burner head is securely installed, plug the appliance back in, and test to make sure the burner is functioning properly. If all is well, you can now enjoy your newly updated appliance.
Please keep in mind, these instructions are for general guidance and should always be used in conjunction with the manufacturer's manual, if available.


