Online Sale!
100% Guaranteed Genuine Parts
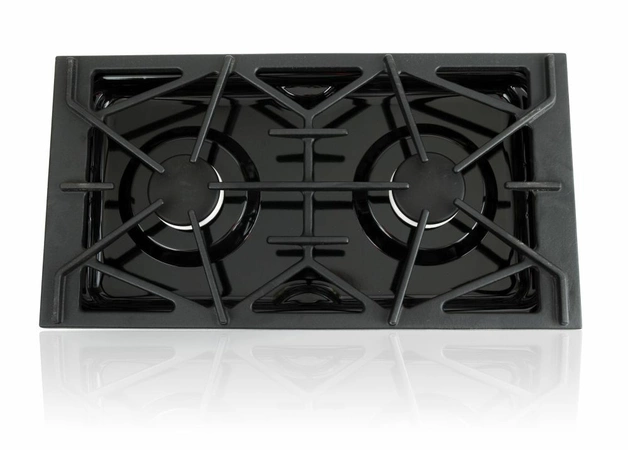
JGA9150ADP Whirlpool Gas Burner Cartridge 2 Black
Whirlpool Maytag Jenn-Air Range Cook Top Black Gas Sealed Burner Cartridge JGA9150ADP
● One-Piece Porcelain-On-Cast Iron Burner Grates.
● Two Sealed Burners.
We are a Factory Authorized Parts Distributor for Whirlpool Maytag Jenn-Air. Trust us for all of your Whirlpool Maytag Jenn-Air appliance parts and accessories needs.
● One-Piece Porcelain-On-Cast Iron Burner Grates.
● Two Sealed Burners.
We are a Factory Authorized Parts Distributor for Whirlpool Maytag Jenn-Air. Trust us for all of your Whirlpool Maytag Jenn-Air appliance parts and accessories needs.
Weight : 12.00 lbs
Dimension : 24.80 x 11.80 x 5.70
Compatible Brands


About this product
Whirlpool Maytag Jenn-Air Range Cook Top Black Gas Sealed Burner Cartridge JGA9150ADP
● One-Piece Porcelain-On-Cast Iron Burner Grates.
● Two Sealed Burners.
We are a Factory Authorized Parts Distributor for Whirlpool Maytag Jenn-Air. Trust us for all of your Whirlpool Maytag Jenn-Air appliance parts and accessories needs.
● One-Piece Porcelain-On-Cast Iron Burner Grates.
● Two Sealed Burners.
We are a Factory Authorized Parts Distributor for Whirlpool Maytag Jenn-Air. Trust us for all of your Whirlpool Maytag Jenn-Air appliance parts and accessories needs.
Weight : 12.00 lbs
Dimension : 24.80 x 11.80 x 5.70
No more associated models for this part.
Step 1: Brush off the Exterior
Before attempting to replace the JGA9150ADP Whirlpool Gas 2 Burner Cartridge, Black, start by brushing off the exterior of the cartridge with a dry cloth. This will help you see any potential problems and will ensure that your work area is clean and safe.
Step 2: Turn Off the Gas
Before removing the gas cartridge, be sure to turn off the gas supply. This should be done at both the valve and the service shutoff. Check the burner knob for an OFF position and switch it to that position if available.
Step 3: Disconnect the Cartridge
Using a wrench, loosen the nut on the gas line attached to the burner cartridge. Be sure to wear protective gloves when doing this. Once the nut is loosened, carefully remove the gas line from the cartridge.
Step 4: Remove the Cartridge
Using a flat screwdriver, carefully lift up one corner of the cartridge to separate it from the burner. Then, slowly lift the remaining sides of the cartridge to remove it from the burner.
Step 5: Install the New Cartridge
To install the new cartridge, place it onto the burner in the same orientation as the old one. This will ensure that the seal is tight and that the gas flow is correct. Secure the new cartridge by tightening the nut on the gas line.
Step 6: Test the Connections
Before turning the gas back on, check all of the connections to make sure they are secure. If everything looks good, then it’s time to turn the gas back on.
Step 7: Test the Burner
Once the gas is turned back on, test the burner by turning the knob to ON. If the burner ignites, then the replacement of the JGA9150ADP Whirlpool Gas 2 Burner Cartridge, Black was successful!
Please keep in mind, these instructions are for general guidance and should always be used in conjunction with the manufacturer's manual, if available.
Write Your Own Review


