Online Sale!
100% Guaranteed Genuine Parts
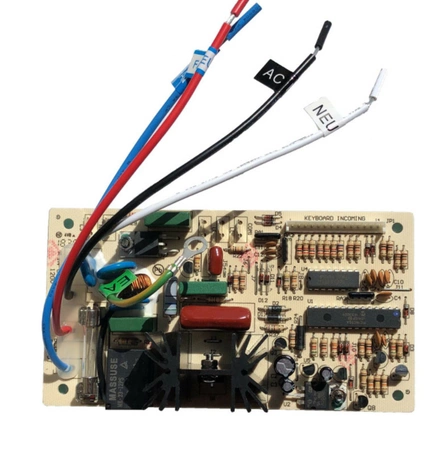
DE81-07744A Samsung Control Board Assembly
This Dacor Range Oven Electronic Control Board 700991 works with all of the following Dacor downdraft hood models:
RV30 RV36
RV46 RVR30
RVR36 RVR46
RVC30 RVC36 RVC46
RV30 RV36
RV46 RVR30
RVR36 RVR46
RVC30 RVC36 RVC46
Weight : 0.32 lbs
Package Dimension : 6.02 x 3.78 x 1.93
Compatible Brands

About this product
This Dacor Range Oven Electronic Control Board 700991 works with all of the following Dacor downdraft hood models:
RV30 RV36
RV46 RVR30
RVR36 RVR46
RVC30 RVC36 RVC46
RV30 RV36
RV46 RVR30
RVR36 RVR46
RVC30 RVC36 RVC46
Weight : 0.32 lbs
Package Dimension : 6.02 x 3.78 x 1.93
The following parts are replaced by this product
- DR82700
- 86100
- 82700
- 72028
- 72281
- 72881
- 700991
No more associated models for this part.
Replacing the Samsung DE81-07744A SVC-Control Board Assy
Tools and Materials Needed:
• New Samsung DE81-07744A SVC-Control Board Assy
• Phillips screwdriver
• Safety glasses
Step 1: Prepare for the Replacement
Before you begin, make sure that you have the new Samsung DE81-07744A SVC-Control Board Assy on hand as well as the necessary tools. You should also ensure that you have some safety equipment, such as safety glasses or goggles, to protect your eyes from debris and dust.
Step 2: Locate the Control Board
Locate the control board in your device. This can usually be found at the back of the unit, underneath any removable panels.
Step 3: Disconnect Power Sources
Disconnect any power sources connected to your device before you begin work. This is an important safety precaution.
Step 4: Remove old Control Board Assembly
Once the power sources are disconnected, use your Phillips screwdriver to remove the screws holding the old control board assembly in place. Once the screws are removed, carefully pull out the old assembly.
Step 5: Install New Control Board Assembly
Take the new Samsung DE81-07744A SVC-Control Board Assy and insert it into the same slot as the old assembly. Make sure that it is properly seated before proceeding.
Step 6: Secure New Control Board Assembly
Once the new control board assembly is inserted, use the Phillips screwdriver to secure it in place. Make sure that it is properly secured with all of the screws before proceeding.
Step 7: Reconnect Power Sources
Once the new control board assembly is installed and secured, reconnect the power sources to your device.
Step 8: Test Your Device
Once all of the power sources are reconnected, turn your device on and test it to make sure that it is working properly. If everything appears to be working properly, then you have successfully replaced the Samsung DE81-07744A SVC-Control Board Assy.
Congratulations! You have successfully replaced the Samsung DE81-07744A SVC-Control Board Assy.
Please keep in mind, these instructions are for general guidance and should always be used in conjunction with the manufacturer's manual, if available.


