Online Sale!
100% Guaranteed Genuine Parts
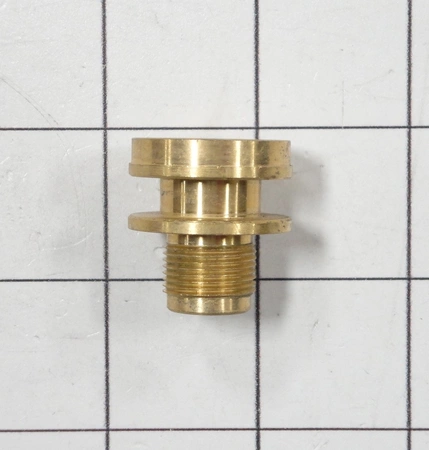
DE81-06137A Samsung Inner Burner Base
Inner burner base c works with some Dacor models of range / cooktops.
Compatible Brands

About this product
Inner burner base c works with some Dacor models of range / cooktops.
The following parts are replaced by this product
- 103801
No more associated models for this part.
How to Replace the Samsung DE81-06137A SVC-INNER BURNER BASE COOKTOP
There may come a time when your Samsung SVC-inner burner base cooktop needs to be replaced. Replacing this type of cooktop can be a difficult task, so it’s best to follow specific instructions in order to get the job done correctly. With the right tools and some handy DIY know-how, you’ll be able to replace the Samsung DE81-06137A SVC-Inner burner base cooktop in no time.
Materials Needed:
-Hammer
-Screwdriver
-NEW Samsung DE81-06137A SVC-Inner burner base cooktop
-Pliers
-Safety goggles
Step 1: First, make sure to shut off the main power source to your cooktop. It’s also a good idea to unplug any other appliances and electronics that are connected to the same power source.
Step 2: Put on your safety goggles to protect your eyes from flying debris.
Step 3: Use a screwdriver to remove any screws that are securing the burner base cooktop in place.
Step 4: Once all of the screws have been removed, use a hammer to break away any adhesives that may be holding it in place.
Step 5: Next, disconnect any wiring or gas supply lines that are connected to the old burner base cooktop. Make sure to use pliers if needed.
Step 6: Carefully lift out the old burner base cooktop and set it aside.
Step 7: Take the NEW Samsung DE81-06137A SVC-Inner burner base cooktop and install it into the same position as the one you just removed.
Step 8: Secure it in place with the screws that you removed earlier.
Step 9: Reattach any wiring or gas supply lines that were previously disconnected.
Step 10: Finally, restore power to the cooktop and test it out to make sure it is working properly.
Congratulations, you’ve successfully replaced the Samsung DE81-06137A SVC-Inner burner base cooktop. With these easy steps, you’ll be cooking like a professional in no time!
Please keep in mind, these instructions are for general guidance and should always be used in conjunction with the manufacturer's manual, if available.
Please Verify Your Purchase to Submit a Review
Please note: We use this information only to confirm your purchase, it won’t be published.


