Online Sale!
100% Guaranteed Genuine Parts
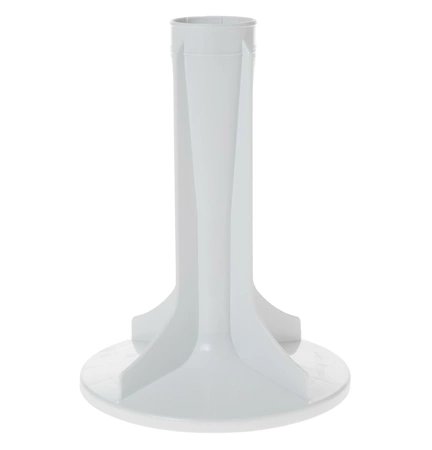
WH43X10056 GE Washer Dryer Combo Agitator
Maintain your laundry experience with this high-quality agitator, designed specifically for select GE washer dryer combo models. Engineered for durability and efficiency, it ensures optimal performance, delivering a thorough and even wash for your clothes. This part is also compatible with Hotpoint, Haier, Monogram, and Café appliances, making it a versatile choice for various laundry setups. Whether you’re replacing a worn-out component or simply enhancing your washer’s capabilities, this agitator is the ideal solution. Easy to install and built to last, it promises to provide you with the reliable cleaning power you need. Keep your laundry routine smooth and effective with this essential washer part.
Weight : 21.23 lbs
Package Dimension : 17.60 x 13.00 x 12.90
Compatible Brands


About this product
Maintain your laundry experience with this high-quality agitator, designed specifically for select GE washer dryer combo models. Engineered for durability and efficiency, it ensures optimal performance, delivering a thorough and even wash for your clothes. This part is also compatible with Hotpoint, Haier, Monogram, and Café appliances, making it a versatile choice for various laundry setups. Whether you’re replacing a worn-out component or simply enhancing your washer’s capabilities, this agitator is the ideal solution. Easy to install and built to last, it promises to provide you with the reliable cleaning power you need. Keep your laundry routine smooth and effective with this essential washer part.
Weight : 21.23 lbs
Package Dimension : 17.60 x 13.00 x 12.90
DIY Instructions for Replacing the WH43X10056 GE Washer, Washer/Dryer Combo Agitator
Replacing the agitator on a GE Washer/Dryer combo is not as difficult as you might think. You can save money by taking on this repair project yourself. Here are step-by-step instructions to help you tackle this task and replace the agitator of your WH43X10056 GE Washer/Dryer combo quickly and easily.
Safety First:
Before proceeding with this repair, turn off the power to the washer/dryer combo at the circuit breaker. Do not attempt this repair without turning off the power.
What You Will Need:
• Replacement agitator (WH43X10056)
• Wrench
• Screwdriver
• Towel
Instructions:
1. Unplug your washer/dryer combo from the wall outlet.
2. Place a towel in the bottom of the drum to prevent small parts from falling into the drain hose.
3. Locate the agitator in the center of the washer and use your wrench to unscrew the nut that holds the agitator in place. When the nut has been removed, carefully lift the agitator out.
4. Insert the new agitator into the washer and secure with the wrench using the same nut that held the old agitator in place.
5. Use a screwdriver to remove the top lid of the washer/dryer combo. You should see the motor and transmission assembly. Remove the mounting screws holding the transmission in place.
6. Pull the old transmission out of the assembly and insert the new one. Replace the mounting screws and secure the transmission in place.
7. Replace the lid to the washer/dryer combo and plug back into the wall outlet. Your WH43X10056 GE Washer/Dryer combo agitator is now replaced.
Conclusion:
Replacing the WH43X10056 GE Washer/Dryer Combo agitator is an easy task when you have the right tools and directions. By following this guide you can complete this repair in less than an hour and get back to enjoying your washer/dryer combo with peace of mind.
Please keep in mind, these instructions are for general guidance and should always be used in conjunction with the manufacturer's manual, if available.


