Online Sale!
100% Guaranteed Genuine Parts
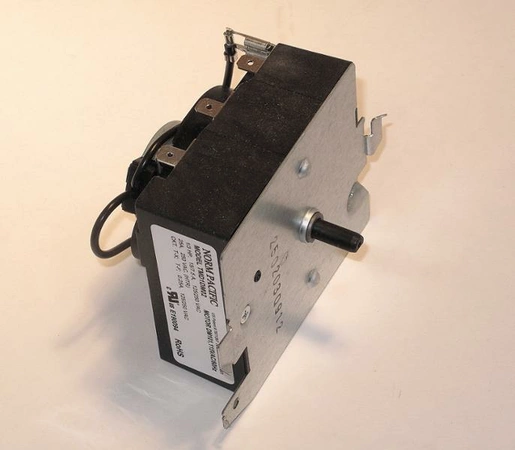
WE4M359 GE Dryer Control Timer Assembly with Plastic Shaft
WE4M359 is an original equipment manufactured (OEM) part. Enhance the performance of your dryer with the control timer assembly designed for reliability and functionality. Engineered by GE, this essential component offers precise timing control to ensure optimal drying cycles, preventing overheating and extending the life of your appliance. The durable plastic shaft increases longevity, making it an ideal replacement for your worn-out timer.
Compatible with a range of brands—including Hotpoint, Haier, Monogram, and Café—this versatile part seamlessly integrates into various dryer models. Installing this circuit board timer is straightforward, helping you restore your appliance quickly and efficiently. Trust this quality part to keep your laundry routine running smoothly, eliminating frustration with failed drying cycles. Maintain your dryer today for enhanced performance and dependable results.
Weight : 0.50 lbs
Package Dimension : 3.82 x 3.62 x 5.04
Compatible Brands


About this product
WE4M359 is an original equipment manufactured (OEM) part. Enhance the performance of your dryer with the control timer assembly designed for reliability and functionality. Engineered by GE, this essential component offers precise timing control to ensure optimal drying cycles, preventing overheating and extending the life of your appliance. The durable plastic shaft increases longevity, making it an ideal replacement for your worn-out timer.
Compatible with a range of brands—including Hotpoint, Haier, Monogram, and Café—this versatile part seamlessly integrates into various dryer models. Installing this circuit board timer is straightforward, helping you restore your appliance quickly and efficiently. Trust this quality part to keep your laundry routine running smoothly, eliminating frustration with failed drying cycles. Maintain your dryer today for enhanced performance and dependable results.
Weight : 0.50 lbs
Package Dimension : 3.82 x 3.62 x 5.04
1.Preparing for the Repair: Before you begin your repair, unplug the dryer and shut off the gas supply valve if it is a gas dryer. Gather your tools and supplies, which include a putty knife, 1/4-inch nut driver, Phillips screwdriver and replacement timer.
2.Removing the Cabinet: Remove the screws in the back of the dryer that secure the top panel. Once the screws are removed, lift up the top panel and set aside. Use the putty knife to remove the screws that hold the front cover in place. Lift the front cover off the dryer and place it on a surface that won’t scratch or damage it.
3.Locating the Timer: Look for the timer knob on the control panel. This knob is driven by a shaft connected to the center of the timer. Follow the shaft back to locate the timer. Use your fingers to remove the panel that covers the timer, or remove any screws that secure it.
4.Removing the Timer: Disconnect the electrical connections on the back of the timer that connect it to the wiring harness. Unscrew the retaining screws that hold the timer in place with a nut driver. Pull out the timer once the screws are removed.
5.Replacing the Timer: Place the new timer in the same position as the old one, making sure the plastic shaft lines up. Secure the timer with the retaining screws. Connect the electrical connections on the back to the wiring harness. Replace the panel that covers the timer.
6.Reassembling the Dryer: Replace the front cover on the dryer and secure it with the screws. Place the top panel back on the dryer, lining up the tabs. Secure the top panel with the screws. Plug the dryer back in and turn on the gas supply valve. Test the dryer to ensure the timer works properly.
Please keep in mind, these instructions are for general guidance and should always be used in conjunction with the manufacturer's manual, if available.


