Online Sale!
100% Guaranteed Genuine Parts
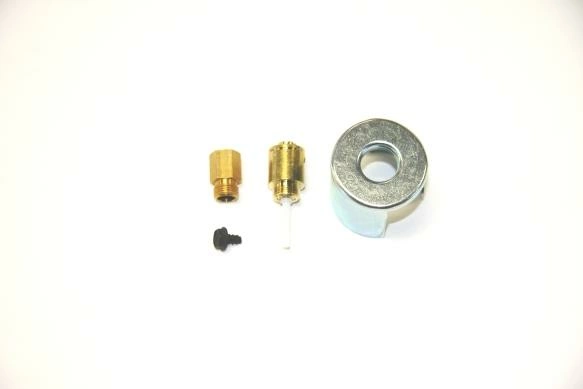
WE25X217 GE LP Natural Gas Conversion Kit
WE25X217 is an original equipment manufactured (OEM) part. Transform your dryer’s performance with this essential installation kit designed for seamless conversion to natural gas. Crafted by a trusted brand, the kit provides the necessary components to ensure compatibility and efficiency in various GE models alongside Hotpoint, Haier, Monogram, and Café appliances. Elevate your drying experience with optimized gas usage while enjoying the benefits of increased performance and reduced energy costs. This comprehensive solution simplifies the transition process, making it a must-have for anyone looking to Maintain their dryer setup. Whether you're a DIY enthusiast or a professional technician, the installation kit promises reliable results and durability. Trust in this expertly engineered product to meet your drying needs effectively.
Weight : 0.18 lbs
Package Dimension : 4.53 x 3.46 x 1.57
Compatible Brands


About this product
WE25X217 is an original equipment manufactured (OEM) part. Transform your dryer’s performance with this essential installation kit designed for seamless conversion to natural gas. Crafted by a trusted brand, the kit provides the necessary components to ensure compatibility and efficiency in various GE models alongside Hotpoint, Haier, Monogram, and Café appliances. Elevate your drying experience with optimized gas usage while enjoying the benefits of increased performance and reduced energy costs. This comprehensive solution simplifies the transition process, making it a must-have for anyone looking to Maintain their dryer setup. Whether you're a DIY enthusiast or a professional technician, the installation kit promises reliable results and durability. Trust in this expertly engineered product to meet your drying needs effectively.
Weight : 0.18 lbs
Package Dimension : 4.53 x 3.46 x 1.57
The following parts are replaced by this product
- WE25X190
- WE25X195
- WE25X214
- WE25X216
- WE25M32
- WE25M0032
- WE25X0190
- WE25X0214
- WE25X0216
- WE25X0217
Step 1: Prepare the LP Conversion Kit
Before starting the conversion process, familiarize yourself with all the components of the GE Dryer Conversion Kit NAT. to LP. Make sure you have all the parts and any tools necessary for the conversion.
Step 2: Disconnect the Natural Gas Line
Disconnect the natural gas line from the dryer by loosening the nuts and turning them counterclockwise. Unplug the dryer’s power cord before disconnecting any gas hose.
Step 3: Install the LP Gas Hose
Securely connect the LP gas hose using the nuts provided in the conversion kit. Make sure the connections are tight and secure.
Step 4: Connect the Pressure Regulator
Connect the pressure regulator to the regulator on the wall. Measure and cut the hose to the desired length, then slide the clamp over the end. Make sure to tighten the clamps securely.
Step 5: Mount the LP Convertor Kit
Mount the LP convertor kit in its original position. Reattach the screws that were used to remove the unit and make sure they are properly secured.
Step 6: Reconnect the Hoses
Reconnect the hoses connected to the LP convertor kit. Make sure the connections are secure and make sure the valves are open. Be careful not to over-tighten the connections as this may cause damage.
Step 7: Test the Conversion
Turn on the dryer and check for any gas leaks. If there are none, your conversion is complete.
Please keep in mind, these instructions are for general guidance and should always be used in conjunction with the manufacturer's manual, if available.


